

The ultimate goal of this series of posts is to build an actual router using basic Arch Linux components. However, in keeping with my patented one-step-at-a-time philosophy I will aim for something much more basic in this first post. I am going to establish a WAN side and a LAN side and have both use DHCP (client and server, respectively). This will not be sufficient for actual routing, i.e. for packets to travel from the one network to the other. What it will achieve is a host that can talk to the world and that we can talk to. Think of it as a Janus box, if you will. The setup will naturally evolve in following posts.
While there are a lot of associations connected with the terms WAN and LAN, I use them here in the most basic of senses, i.e. that someone is making a network available to us on the WAN side (i.e. they allow us to join their network), whereas on the LAN side, we are the ones creating a network that can be joined by our devices. In technical terms: On the WAN side we run a DHCP client, on the LAN side a DHCP server. To restate the goal for this post in these terms: We should have access to the host from the LAN side, e.g. for SSH, and the host should have access to the WAN.
The WAN in question can be the internet, your ISP’s private network (see: carrier-grade NAT) or your own private network (e.g. one supplied by a more mature router). It doesn’t really matter for our purposes, right now. However, because of the lack of maturity and security of this setup, it is wise to use another router between it and the internet, especially if your ISP does not have you covered in that regard (i.e. does not use CG-NAT).
Hardware
For the purposes of this exercise, we need a machine with two or more physical network interface controllers (NICs) and some non-network output from the machine as we will need to configure networking before we can rely on connecting via SSH. This means either a serial output or a display output. Also: Should you lock yourself out of the machine when setting firewall rules – I think most router tinkerers have been there – display/serial gives you an easy way back in. If the machine has neither, you may still be able to get linux on it by first adding the install drive to another machine with a display output and starting the install there. Once you’ve got SSH up and running you may be able to move the drive to your router. At least, I think – I haven’t tried.
If you’re in need of a recommendation and live in the EU, I have multiple good experiences with teklager.se, a family run, Swedish webshop that seems to genuinely care about open source networking. Basically, get whatever their main router product is at the time of reading (at time of writing it’s the TLSense J6412 which unlike their older models has display options including an HDMI port). I definitely recommend getting something with modern display outputs (HDMI or Displayport). If you don’t have one on hand, finding a VGA monitor in 2026 is a pain. Messing about with serial connections even more so. I do not recommend hardware that integrates a wifi access point. Access points can always be added to the local network at a later stage (and we will get there in due course), and keeping them as separate devices makes for greater physical flexibility and a clearer setup. That is however, more gut feeling than technical analysis. Finally, I recommend going with three NIC ‘s but not necessarily more than that. One for WAN, one for LAN, and one for DMZ (optional). The need for any more on the LAN side is better served by a switch, probably one with Power over Ethernet (PoE) as you will likely need that for access points anyway. If router hardware with integrated PoE in dedicated LAN ports are available (hello, consumers from the future!), maybe get that but be mindful of not being able to uprade PoE without upgrading the router itself.
OS and installation
I will be assuming a working, basic Arch Linux installation with systemd-networkd as the network management software. Other linux distros, e.g. Debian server will in all likelihood do just as well. Why do I recommend Arch for this other than #BTW reasons? Well, take a look at this htop view of a fairly fresh Arch install:
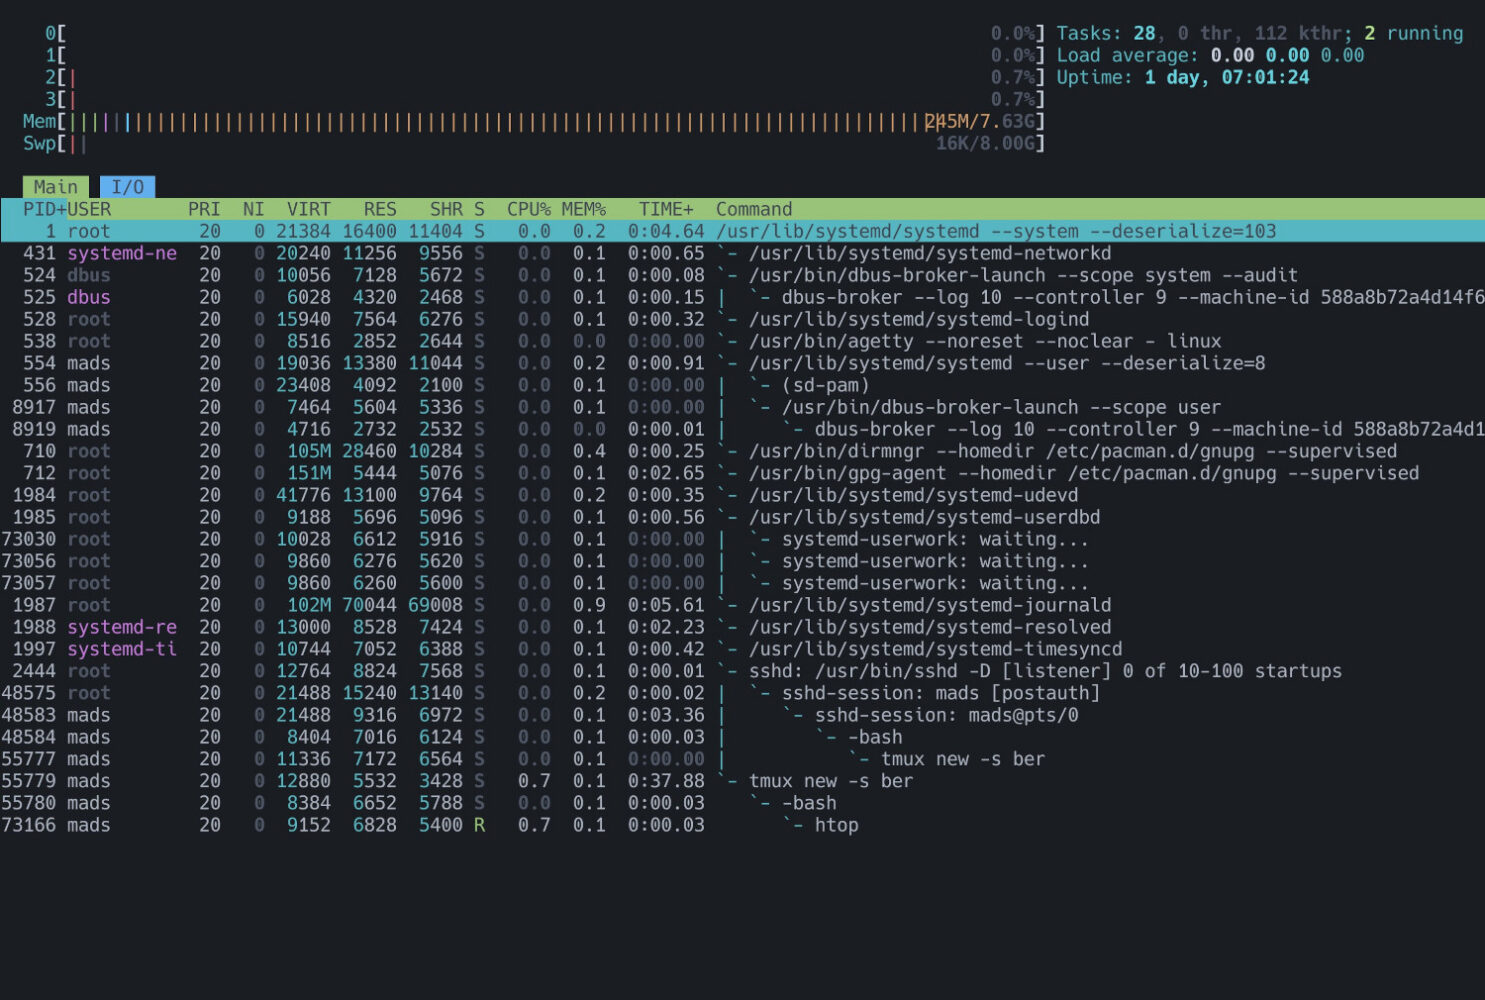
I tried Ubuntu server first and there were 3-4 times the number of processes from the get go (going on memory, probably more). Maybe for good reasons, I don’t know. When it comes to security I generally lean towards less being more.
systemd-networkd is part of systemd and as such should be available by default on an Arch Linux install. That, and your text editor of choice, is really all we need for this first part.
In general, install as few additional packages as possible and definitely as few services as possible. A router should ideally be a router and nothing else. It can be tempting to have the host doing double duty as a router, and a file server, and a pi-hole, and… While I understand that sentiment, what with hardware not being as plentiful as it was a year or two ago, it’s best to leave those jobs for another machine. Isn’t there a Raspberry Pi 3b collecting dust somewhere in a cupboard?
Identifying NICs
When you have one network interface controller on your machine, it’s not hard figuring out which ethernet port the name on the screen corresponds to. When you have four, it gets a little dicier. Since we will be specifying different configurations for different jacks, it’s helpful to know which physical port corresponds to which name in the OS.
I have four gigabit ethernet interface controllers on my router. It might be worth noting that none of them are created special, in contrast to the way that commercial router may make the WAN port seem special (e.g. on my old TP-Link Archer, the WAN port is blue and set apart from the yellow LAN interfaces). Hardware-wise, they’re all the same, just instances of a 1 Gb/s Intel NIC component. Any special function is derived from the config, I am about to set, not built-in.
Here’s the list I get from running ip link:
1: lo: <LOOPBACK,UP,LOWER_UP> mtu 65536 qdisc noqueue state UNKNOWN mode DEFAULT group default qlen 1000
    link/loopback 00:00:00:00:00:00 brd 00:00:00:00:00:00
2: enp1s0: <BROADCAST,MULTICAST,UP,LOWER_UP> mtu 1500 qdisc mq state UP mode DEFAULT group default qlen 1000
    link/ether 00:0d:a6:f2:11:b4 brd ff:ff:ff:ff:ff:ff
    altname enx000db9576bb4
3: enp2s0: <BROADCAST,MULTICAST,UP,LOWER_UP> mtu 1500 qdisc mq master br0 state UP mode DEFAULT group default qlen 1000
    link/ether 00:0d:a6:f2:11:b5 brd ff:ff:ff:ff:ff:ff
    altname enx000db9576bb5
4: enp3s0: <BROADCAST,MULTICAST,UP,LOWER_UP> mtu 1500 qdisc mq master br0 state UP mode DEFAULT group default qlen 1000
    link/ether 00:0d:a6:f2:11:b6 brd ff:ff:ff:ff:ff:ff
    altname enx000db9576bb6
5: enp4s0: <BROADCAST,MULTICAST,UP,LOWER_UP> mtu 1500 qdisc mq state UP mode DEFAULT group default qlen 1000
    link/ether 00:0d:a6:f2:11:b7 brd ff:ff:ff:ff:ff:ff
    altname enx000db9576bb7
If you are unclear on the subtleties of the ip command: ip link is for dealing with or listing network interfaces, ip address (or addr, or ad, or a.. it’s a wonderfully forgiving tool) is for ip addresses. While the latter may often display all the relevant information about the interface, it is technically more correct to use ip link when it’s the interface we are inspecting.
Back to the case at hand: I have a loopback interface (lo) which is a logical, non-physical interface, only accessible to the host itself. I also have four enpXs0 devices. Note that the list does not contain any wifi devices as there are none attached to the router. As I mentioned under recommendations, wifi will be delivered by dedicated access points which I will talk about in a later post.
The naming of the devices follow the predictable naming convention introduced by systemd v197 and clearly lands on the third of the listed naming schemes:
3. Names incorporating physical/geographical location of the connector of the hardware (example: enp2s0)The advantage here is that I can rely on that the physical device currently called enp1s0 will always be enp1s0. I.e. I don’t run the risk of WAN configuration being used on a LAN side port. Also: I get this advantage without the use of long nonsensical names incorporating MAC addresses (the systemd ‘alternate’ scheme that is refered to by ip link as the devices’ altname).
Still, that doesn’t answer the question: Which physical port does enp1s0 correspond to? The leftmost one? The rightmost one? One of the middle ones? The options I have identified are: trial-and-error, assuming numbering from left-to-right or right-to-left and ethtool (thanks to Matthias Geniar for his post on that). The latter is a simple little tool that will flash the lights on the NIC in an attention-grabbing way. To find out whether enp1s0 is the port, I think it is, I run (requires root):
ethtool -p enp1s0And watch the blinkenlights to see which one stands out (runs an alternating left-right scheme).
WAN side
It is fairly simple to setup a network interface in systemd-networkd. It makes no attempts at auto-configuration, so by default no NICs should be assigned any addresses whether they’re connected or not. In order for that to happen I need to place a .network file in /etc/systemd/network with a [Match] section that matches the NIC in question. I am assuming an empty network folder here – no .network, .netdev or .link files. No files other than those we explicitly create here should be required. The .network files in the directory are processed in alphanumerical order so a file named 10-something.network comes before a file called 99-something.network. Note that it’s not numerical sorting: a file called 2-something.network will come after 10-something.network so stick to the ‘two digits dash simple descriptive name’ system as ordering will soon be important.
Because I can trust that the name enp1s0 will consistently and predictably be attached to the same physical interface, I will simply match on that and use that for my WAN configuration. So the first two lines of 10-wan.network read:
[Match]
Name=enp1s0
I could also have matched on e.g. the MAC address or made wildcard matches (*) that could apply to multiple NICs. Needless to say I only want one NIC to match the WAN config so that isn’t a relevant feature here.
Next is the [Network] section of the same .network file:
[Network]
DHCP=ipv4
LLMNR=no
MulticastDNS=no
IPv6AcceptRA=no
The DHCP setting simply instructs systemd to run a DHCP client, asking for an IPv4 address (and only that). In addition local names are disabled on this interface.
At time of writing, an IPv4 exclusive setup is still an option, so the sake of simplicity this is what I’m going for first. Data published by Google shows that IPv6 adoption has progressed to the point where IPv6 traffic finally outweighs IPv4 traffic. I will try to cover IPv6 in a later installment. For now I want to be sure that I’m only operating with IPv4. I am unsure if explicitly not accepting IPv6 router advertisement is really necessary for this – seeing as I am not running an IPv6 DHCP client but rather safe than sorry.
If you are connecting directly to you ISP, check that they don’t require VLAN tagging. If so, a simple DHCP client request as above will not succeed. If this goes for your ISP, I recommend using their router as the direct connection to them and your own immediately ‘downstream’ of it. At least for the time being. I will try to cover VLAN setups in a later post as this setup can be converted into one that complies with VLAN requirements thus obviating the need for go-betweens.
And that is essentially it. There are a lot more options available but just to get started, all I need to do is to save the file and restart systemd-networkd (requires root):
systemctl restart systemd-networkd.serviceThen I run ip addr and it should tell me that the interface now has an IPv4 address:
2: enp1s0: <BROADCAST,MULTICAST,UP,LOWER_UP> mtu 1500 qdisc mq state UP group default qlen 1000
    link/ether 00:0d:b9:57:6b:b4 brd ff:ff:ff:ff:ff:ff
    altname enx000db9576bb4
    inet 100.98.28.163/16 metric 1024 brd 100.98.255.255 scope global dynamic enp1s0
       valid_lft 2265sec preferred_lft 2265sec
    inet6 fe80::20d:b9ff:fe57:6bb4/64 scope link proto kernel_ll
       valid_lft forever preferred_lft forever
LAN side
If we have but one available NIC left, that will obviously be the LAN port. If you have multiple, identify (see: ethtool above) and pick one. We will shortly expand to how to use multiple LAN ports without getting multiple LAN’s that we have to route between. For now – and for the readers without more than one LAN port – we will do the setup for a single LAN port.
Once again we create a .network file in the directory /etc/systemd/network. It is not of importance whether the WAN or LAN device is configured first, however since WAN was 10-wan.network, LAN will be 20-lan.network, leaving space in between should it be needed.
Just like with the WAN network, we start off identofying it with a [Match] section:
[Match]
Name=enp2s0
And again a [Network] section:
[Network]
DHCPServer=yes
Address=10.0.0.1/24
LLMNR=no
MulticastDNS=yes
LinkLocalAddressing=no
It really is quite surprisingly simple. We will have a DHCPServer, yes please, and it will have the Address 10.0.0.1 and operate in a subnetwork of the addresses from 10.0.0.0 to 10.0.0.255 (i.e. the first 24 bits designate the network part of the address, leaving 8 bits or 256 addresses within that network). Other private network ranges are of course available and probably more suitable, e.g. 192.168.0.0/16. 10.0.0.0/24 (or /8) is just more memorable. Unlike on the WAN side, local names, e.g. MulticastDNS, are encouraged (except for Microsoft’s LLMNR scheme). LinkLocalAddressing is useful if 1:1 connections without routers are needed but I don’t see any case for that here, so it’s disabled until I see a reason to enable it.
Systemd-networkd also has a number of options for further specifying how our DHCP server should operate. These are relegated to the [DHCPServer] section:
[DHCPServer]
PoolOffset=98
DNS=1.1.1.1
EmitDNS=yes
PoolOffset controls from what address the DHCP server should begin handing out addresses to clients. The documentation states that the default is to start “at the first address after the subnet address” but if “the pool includes the server address (the default), this is reserved and not handed out to clients.” I figure that this means that a starting point of 10.0.0.2 (the start of the subnet apart from the server address) gets bumped up to 10.0.0.100 though I am not entirely sure it’s not 10.0.0.99. Anyway, the point is to reserve a number of addresses for static assignment, i.e. clients simply taking IP addresses without asking the DHCP server, should I need it. DNS sets a DNS server to be used for EmitDNS. It does not alter what DNS server is used on the host and it can be skipped if systemd can get a clear idea of what DNS server is in use elsewhere (e.g. from systemd-resolved or /etc/resolv.conf). EmitDNS controls whether the DHCP server suggests a DNS server to clients. I originally set it to no (I will set it locally on each client device), but i noticed Android devices acting very lost, even with a locally set DNS server, if the DHCP server didn’t suggest anything.
If you don’t have multiple LAN ports, you can knock off early here. Restart the systemd-networkd service as above, connect a client to the LAN port and if it’s running a DHCP client it should acquire a lease on an IP address in short time. You should be able to ping the router host from the client and vice versa. Now is a good time to start SSH up on the router.
LAN bridge
As can be seen in the output above the machine I’m using has four NICs. This is two more than are strictly needed for the purpose of a router, i.e. a WAN and a LAN port. I am going to reserve (and recommend reserving) one of these bonus ports for a demilitarized zone or DMZ which is essentially an additional, segregated local network for devices that should not have access to other devices on the LAN. E.g. IoT stuff that scans you local network. This still leaves me with two LAN ports, though. I’ve set up a local network and a DHCP server on one of the ports. Were I to repeat the exercise above for the remaining unused and unreserved NIC, I would have to create another network with a separate private network range (e.g. 10.0.1.0/24). That means that by default hosts connected to the first port would be unable to talk to hosts on the second port because they would be on different networks.
Of course, a router is by definition what you need to move packages from one network to another, so we could definitely set up some routing between these two local networks. Then, however, we would be solving a problem of our own (needless) making. Unless I specifically want to create two separate networks with limited (or no) access to each other’s ressources, there is a much simpler solution. I will create a virtual bridge that will allow two physical NICs to operate as one. Any hosts attached to either NIC will join the same local network. This can easily be extended to additional NIC’s if your host has, say, eight of them in total.
Now, historically a bridge was a physical device to join two physical networks together and allow for some very simple intercommunication between them. That’s not what we’re aiming for here. What I want is a virtual bridge. Basically, I will create a virtual NIC that will subsume the two physical NICs. I will then delete any configuration for either physical NIC and instead apply the above LAN and DHCP configuration to this virtual device. Because the virtual device will own the two physical devices, any host that attaches to either physical device will end up talking to the DHCP server attached to the virtual device, consider the virtual device it’s gateway and become part of it’s network.
First order of business is to create the bridge. This is also done by adding a configuration file to /etc/systemd/network but instead of .network file it’s a .netdev file. For the first time the order of the configuration files is important. Creating and defining this bridge device has to come before we start setting up a network on it. So I create a 18-bridge.netdev file with a single section:
[NetDev]
Name=br0
Kind=bridge
Optionally you can assign a MAC address to this virtual device but I haven’t found any need for it. This file doesn’t do much by itself. We need to assign the physical NIC’s to this bridge which is done using another .network file that I name 19-bridge.network.
[Match]
MACAddress=00:0d:29:57:6b:b5 00:0d:29:57:6b:b6

[Network]
Bridge=br0
You can match on MAC addresses, names, etc. I don’t really recall why I chose MAC addresses for this and names before. Check ip link to get the correct addresses and/or names for the devices. Finally we change the LAN configuration so the LAN is created on the bridge rather than any physical device. This just requires a change in the [Match] section.
[Match]
Name=br0
The network on the bridge should obviously be created after the bridge is created and the physical ports are assigned to the bridge.
Conclusion
The machine as it’s currenty configured is not a router. That’s because it doesn’t move packages from one network to another. The machine itself is attached to two networks (a local network and either the internet or maybe just a wide area network) and can talk to other hosts on either one. Hosts on the local network should also be able to find other hosts on the local network.
Neither of these, however, qualify as routing and I’m sorry to disappoint but actual routing is not even the next topic on the list. We have still more work to do before we’ll get there. In the next post I will talk about using iptables as a basic firewall. In other words it will be about making fewer things possible (saying no to incoming traffic, for instance) rather than making more things possible (letting traffic from devices on the local area network reach the internet).
Partly this is a security precaution. A router is directly connected to the internet or some other network we don’t control. It should most definitely have a firewall, just like any other machine that will see traffic coming in from outside. This order of things will, however, also serve a didactic purpose. Basic firewall rules are a useful and easy-to-follow introduction to iptables, the tool that I will also use for other purposes, like NAT and masquerading, which will finally establish the link between devices on the LAN and the WAN.
Cover image: a yellow ethernet cable on a blue background © Markus Spiske, Unsplash License